Giclee Prints Available in Sizes: 8" x 10" / 12" x 18" / 12" x 16" / 18" x 24" / 24" x 36"
All sizes are available in square 1:1 ratio by request.

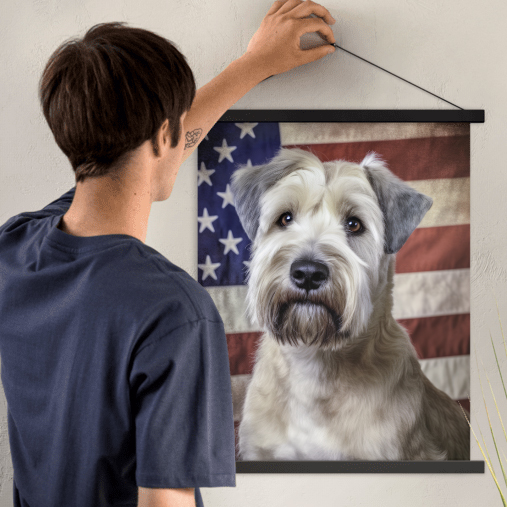
Ready-to-hang black wooden magnetic frame/hanger
included with all picture prints on paper purchased.

Welcome to the k9 Gallery of Art, where we celebrate the canine spirit through captivating art prints! Now that you've chosen the perfect puppy dog masterpiece for your space, it's time to give it the spotlight it deserves. Framing your prints not only enhances their visual appeal but also adds a touch of personality to your space.
Framing your prints is an art form, and with these ideas, you're well on your way to presenting your new fine art acquisition, whether you prefer classic elegance, modern sleekness, or a touch of whimsy.
Visit your local custom framing shop for a professional to assist you with your selection and use their expertise and equipment for framing your prints. You will find they offer an extensive variety of matting and framing options.
The remainder of this article is for the do-it-yourselfer who wants to both save money and make a more unique or personalized presentation. We hope you enjoy and find valuable time saving tips as well as inspiration.
First our list of retailers who specialize in frames and framing materials. We earn no commission and present this as a resource for your convenience.
Classic Wood Elegance Embrace timeless sophistication with a classic wood frame. Opt for a rich, dark finish to complement the warmth of your artwork.
Sleek Metal Modernity For larger prints, go for a sleek metal frame. The clean lines and modern aesthetic will give your masterpiece a contemporary edge.
Matte Magic Use a wide matte around your print for a gallery-like effect. This not only adds a professional touch but also draws attention to the intricate details of the artwork.
Floating Frame Wonder Elevate your larger print by using a floating frame. This minimalist approach creates the illusion that your artwork is suspended in mid-air.
Vintage Charm Hunt for a vintage frame at your local thrift store or antique shop. The worn patina will add character and charm to your print.
Whimsical Washi Tape Embrace a budget-friendly and playful approach by using colorful washi tape to create a border around your print. Mix and match patterns for a vibrant look.
Shadow Box Surprise Go beyond the flat frame and choose a shadow box to add depth to your small to medium size print. This creates a captivating 3D effect, and opens up possibilities of adding momentos inside the frame.
Puppy Dog Duo Pair two prints side by side in matching frames to create a dynamic duo on your wall. This symmetrical approach is pleasing to the eye and doubles the impact. Choose two images that compliment each other in some way.
DIY Pallet or Vintage Wood Frame Get crafty with a DIY pallet frame. Stain or paint the wood to match your decor, adding a rustic touch to your puppy or dog art. Find pallets laying around or at Home Depot or Lowes.
Vintage wood can be easily pieced together to make fantastic conversation starting frames. The outdoorsy look and feel compliments the beautiful dog pictures.
MEASURING FOR SUCCESS
Fitting a frame to your print is a crucial step to ensure that your artwork looks its best. Here is a step-by-step guide to help you perfectly fit a frame to your new artwork. First you will need a few basic tools:
Level: A level is an essential tool for ensuring that your frames are hung straight. You know the gizmo with an air bubble that moves inside a tube until it hits the mark in the center. This is especially important when creating gallery walls or hanging multiple frames together.
Measuring Tape: Either a cloth or spring loaded metal measuring tape will work fine. In the US we use inches. Most measuring tapes have both inches and milimeters. A long well calibrated ruler for drafting or construction will also work well.
Stud Finder: A stud finder is useful for locating the wooden studs behind drywall, providing a secure anchor point for heavier frames.
Hammer and Screwdriver: Depending on the type of hardware you choose; you will need a hammer and screwdriver, flathead or Phillips (4 prongs) for installation.
Measuring Your Print: Before you start looking for a frame, accurately measure the dimensions of your print. Note both the width and height, and make sure to record these measurements in inches.
Choose the Right Frame Size: When selecting a frame, choose one that corresponds to the exact size of your print. Frames are typically labeled with the dimensions they can accommodate. For example, if your print is 18"x24", look for a frame labeled as such.
Consider Matting: If you plan to use a mat with your frame, take this into account when choosing the frame size. Matting can enhance the visual appeal of your print and create a professional look. Ensure that the frame has enough space to accommodate both the print and the mat. See more information on matting below.
Check Frame Depth: Consider the depth of the frame, especially if you have a canvas or a print with a significant thickness. Ensure that the frame is deep enough to encase your print comfortably.
Look for Adjustable Frames: Some frames come with adjustable components to fit different print sizes. These frames often have flexible clips or fasteners that can be adjusted to secure your print snugly.
Double-Check Before Purchasing: Before making a purchase, double-check the frame's dimensions and specifications. Ensure that it matches the size of your print and any additional elements like matting.
Assembly: Once you have the frame, carefully follow the assembly instructions. Most frames come with easy-to-follow guidelines for inserting your print securely. Take your time to ensure that everything is aligned and fits perfectly.

Wall Hanging Hardware:
After framing your print, hang it with care. Use appropriate hardware and follow the recommended guidelines for hanging frames on your type of wall (drywall, plaster, etc.) There are diverse types of wall hangers available, each designed to accommodate different weights, wall materials, and hanging methods. Before choosing a wall hanger, consider the weight and size of your frames, the type of wall you have, and your preferred aesthetic. Always follow the manufacturer's recommendations.
Traditional Picture Hooks: These are simple hooks with a nail or screw that you can hammer or screw directly into the wall. They are suitable for lighter frames and are easy to install.
Sawtooth Hangers: Sawtooth hangers are metal brackets with a sawtooth-shaped edge. They are commonly attached to the back of frames and are suitable for smaller to medium-sized frames.
D-Ring Hangers: D-ring hangers are metal rings shaped like a "D" that are attached to the back of a frame. They often require screws to hang the frame securely.
Wire Hangers: A wire hanger is a flexible wire that runs between two points on the back of a frame. It's a versatile option for hanging frames and is often used for larger, heavier pieces.
Adhesive Hooks: Adhesive hooks are a great option if you want to avoid putting holes in your wall. They come in various weight capacities and can be easily removed without damaging the wall.
Command Strips: Command strips are adhesive strips that can hold a surprising amount of weight. They come in various sizes and are suitable for frames of different dimensions.
French Cleat: A French cleat is a two-part mounting system that provides strong support for heavier frames. It consists of a wall-mounted bracket and a mating bracket attached to the back of the frame.
Keyhole Hangers: Keyhole hangers are slots or holes in the back of a frame that can be placed over screws in the wall. They provide a secure and flush mount for your artwork.
Plate Hangers: Plate hangers are designed for displaying plates, but they can also be adapted for lightweight frames. They come in assorted sizes and can be attached to the back of the frame.
Security Hangers: Security hangers are designed to deter theft or accidental displacement. They often require a special tool for removal, adding an extra layer of protection to your framed art.
Track Systems: Track systems involve installing a horizontal track on the wall, allowing you to move and adjust the placement of multiple frames easily. This is a great option for creating gallery walls.
Gallery Rods: Gallery rods are horizontal rods mounted on the wall, from which frames can be suspended using cables or wires. This provides a flexible and modern display option.
Screws & Nails: Choose the appropriate length and thickness based on your wall type and the weight of the frame.
Wall Anchors: For drywall or plaster walls, especially when hanging heavier frames, use wall anchors to provide additional support and prevent damage to the wall. There are various types of wall anchors, including toggle bolts and plastic anchors. For drywall we recommend large white plastic anchors that look like a giant screw and come with their own appropriately sized metal screws. Easy to push right into wall with electric drill, support a good amount of weight and stay in place. Use two about 6 inches apart for heavy picture frames.
Screw Eyes: Screw eyes are small, circular hooks that can be screwed into the frame for hanging with wire. They provide a secure connection between the wire and the frame.
Drywall Screws: If you're attaching hardware directly to drywall, use drywall screws. They are designed to grip the drywall securely and provide a stable anchor point. Great all around screws, recommended length 1.5".
Wall Plugs: Wall plugs, or wall plugs and screws, are often used in conjunction with wall anchors. They provide additional stability when securing items to walls.
Toggle Bolts: Toggle bolts are suitable for heavier frames and are often used with wall anchors. They provide a strong and secure attachment to drywall. Toggle bolts have a long screw that sits behind the wall and is often longer than the space available. Test depth first with a long nail.
Masonry Screws: If you have brick or concrete walls, masonry screws are designed to penetrate and hold in these harder materials. A high powered electric drill/driver is required.
Picture Hanging Strips: Picture hanging strips use adhesive to attach frames to the wall, making them a great option for lightweight frames and situations where you want to avoid making holes.

WALL PLACEMENT
Eye Level: Hang your print at eye level for the average person. This is typically around 57 to 60 inches from the floor to the center of the artwork. This ensures that the artwork is easily visible and can be appreciated without straining.
Center of Focus: If you have a focal point in the room, such as a piece of furniture or a fireplace, consider centering your print on or above that focal point. This creates a harmonious arrangement and draws attention to the artwork.
Consider Furniture Placement: If you are hanging the print above furniture, such as a sofa or a console table, the bottom edge of the frame should be about 6 to 12 inches above the furniture. This helps integrate the artwork into the overall design.
Gallery Walls: If you are creating a gallery wall with multiple prints, start by hanging the central piece at eye level and then build around it. Maintain consistent spacing between frames for a cohesive look.
Consider Wall Size: For smaller walls, choose a smaller print or create a gallery arrangement with smaller frames. On larger walls, you can go for a larger print or a bold arrangement of multiple frames.
Balance with Surroundings: Consider the overall balance in the room. Avoid placing the print too high or too low in relation to other elements in the space. Aim for a balanced composition that complements the surrounding decor.
Natural Sight Lines: Consider the natural sightlines in the room. Ensure that the print is visible from various vantage points, and it does not obstruct views or feel disconnected from the room's flow.
Lighting Considerations: Pay attention to lighting conditions. Ensure that the artwork is well-lit to highlight its details. Avoid placing it in direct sunlight, as this can cause fading over time.
Experiment with Arrangement: Before making any holes in the wall, experiment with the arrangement by placing the print on the floor and moving it around. This allows you to visualize different options and find the most pleasing placement.
Consider Room Function: Consider the function of the room. In spaces where people often gather, such as the living room or dining area, placing the print centrally can make it a focal point. In more private spaces, such as bedrooms, you may choose a more personal placement.
Remember, there are no strict rules, and personal preference plays a significant role. Trust your instincts and choose a placement that brings joy and enhances the overall atmosphere of your environment.

MATTING TECHNIQUES
The choice of matting for your puppy dog art print can significantly impact its visual appeal. Here are considerations for different matting options:
General Tips on Matting:
Consider Artwork Colors: Analyze the predominant colors in your puppy dog art print. Choose a mat color that complements and enhances the colors in the artwork.
Room Lighting: Consider the lighting conditions in the room. If the room is well-lit, both dark and light mats can work, but in rooms with limited natural light, a light mat may be more suitable.
Frame Compatibility: Ensure that the matting size complements the frame size. The proportions should look balanced, and the mat should not overwhelm the artwork.
Print Size: Consider the size of your puppy dog art print. Larger prints may benefit from wider mats, while smaller prints might look best with narrower mats.
Room Aesthetics: Consider the overall style of the room and your personal taste. Mats can influence the perceived size and impact of the artwork. Experiment with different matting options before making a final decision. Some frames come with matting, but you can also purchase mats separately to customize the look.
The best matting choice is a subjective decision based on your preferences and the overall aesthetic you want to achieve. Whether you choose a single mat, double mat, or no mat, make sure it complements your new fine art print and enhances its visual impact on your wall.
Single Mat
Best Sizes: A single mat can enhance the presentation of your print by providing a clean border. A mat with a width of 2 to 4 inches is aesthetically pleasing.
Considerations: Choose a mat color that complements both the print and your decor. White or off-white mats are classic choices and often work well with puppy dog art, allowing the colors in the print to stand out.
Double Mat
Best Sizes: If you opt for double matting, the outer mat is usually wider than the inner mat. Common combinations include a wide neutral outer mat with a thinner colored inner mat.
Considerations: Double matting adds depth and visual interest. The choice of colors for both mats should harmonize with the print and the room's color scheme. Be mindful of not overpowering the artwork with a mat that is too large.
No Mat
Considerations: For a modern and sleek look, you can choose to frame your print without a mat. This approach allows the artwork to extend to the frame's edge, creating a more contemporary appearance.
Best for: No matting is often suitable for smaller prints or when you want a minimalist aesthetic. It can work well with modern or abstract pieces.
Are dark mats or light mats best?
The choice between dark mats and light mats depends on several factors, including the colors in your dog art print, the overall aesthetic you want to achieve, and the room's decor. Here are considerations for both dark and light mats:
Dark Mats:
Highlighting Light Colors: Dark mats can create a strong contrast and make lighter colors in the print stand out. If you have purchased vibrant or pastel hues, a dark mat can provide a striking backdrop.
Formal and Elegant Look: Dark mats often convey a more formal and elegant appearance. They can add a touch of sophistication to the artwork and the overall presentation.
Reducing Glare: Dark mats are less likely to reflect light and cause glare, which can be beneficial in rooms with varying lighting conditions.
Neutralizing Warm Colors: If your print has warm tones or leans towards reds and oranges, a dark mat can help neutralize the warmth and maintain balance.
Light Mats:
Enhancing Dark Colors: Light mats can create a softer contrast and enhance darker colors in the print. This is particularly effective if your art print has rich, deep tones.
Airy and Contemporary Feel: Light mats generally contribute to an airier and more contemporary feel. They can make the artwork feel lighter and less formal, which may be desirable for certain styles.
Expanding Small Spaces: Light mats can visually expand a smaller space and create a sense of openness. This is beneficial in rooms where you want to maximize the perceived size.
Versatility: Light mats tend to be more versatile and can work well with a variety of art styles. They are often a safe choice if you are unsure about the best matting option.
ACRYLIC (Plexiglass) vs. GLASS
Acrylic (Plexiglass):
Lightweight Acrylic is significantly lighter than glass, making it a practical choice, especially for larger frames. This can be beneficial for ease of handling and hanging.
Durability Acrylic is more impact-resistant than glass. It is less likely to shatter on impact, making it a safer option in environments where breakage could be a concern.
UV Protection Many acrylic sheets come with UV protection, helping to safeguard your puppy dog art print from harmful ultraviolet rays that can cause fading over time.
Less Reflective Acrylic tends to be less reflective than glass, which can be advantageous in spaces with lots of natural or artificial light. This minimizes glare and allows for better visibility of the artwork.
Thickness Options Acrylic is available in various thicknesses. Thicker acrylic sheets may provide additional protection and a sense of depth to the framed artwork.
Glass:
Clarity Glass often provides a clearer and more distortion-free view of the artwork compared to acrylic. This is essential for appreciating fine details in your puppy dog art print.
Scratch Resistance Glass is more scratch-resistant than acrylic. However, it is still important to handle it with care to avoid scratches over time.
Affordability Glass is typically more affordable than acrylic, making it a budget-friendly option for framing. However, this can vary depending on the type of glass chosen (standard, anti-reflective, etc.).
Heavier Glass is heavier than acrylic, so if weight is a concern, especially for larger frames, it's worth considering the lighter alternative.
Traditional Aesthetic Glass has a traditional aesthetic that may be preferred in certain contexts or for specific art styles. It can provide a classic and timeless look to your beautifully framed artwork.
